Creating a lesson plan is a crucial part of the classroom. Educators use lesson plans to guide them through the teaching process so they know exactly what they are going to teach and how. This prevents on the fly teaching and makes sure students are getting the most out of a class or subject.
Lesson plans provide a detailed outline for teachers to follow each class period and ensure that they have meaningful discussions in the classroom.
Before we teach you how to create a lesson plan that works, let us first briefly understand what a lesson plan really is, why every teacher should create a lesson plan, and what are the key things that entail in a lesson plan. Read on…
What is a Lesson Plan? (Definition)
A lesson plan helps instructors keep their daily lessons organized. It’s a smart way of keeping the opening remarks, topics, and assignments in one organized place on a daily basis.
Wikipedia describes it as “the teacher’s guide for running a particular lesson, and it includes the goal (what the students are supposed to learn), how the goal will be reached (the method, procedure), and a way of measuring how well the goal was reached (test, worksheet, homework, etc.)”
Why Lesson Plans are Important?
Lesson plans are an important way of ensuring that topics get covered appropriately and that the class has all of the insight and information they need to understand concepts.
The more organized instructors are with what they are covering, the better chance students have to be engaged, interested, and walk away with new information.
 Some of the main benefits of creating a lesson plan include:
- A lesson plan gives you a detailed outline of how class lessons should go.
- It helps tackle the possible student queries that may arise during a classroom session.
- It empowers teachers to be ready with their material and reduces on the fly teaching.
- It allows educators the time to come up with interesting teaching methodologies and learning activities.
- It provides various learning materials teachers can use during their class.
How to Create a Lesson Plan? Follow these Steps!
Now that you know the importance of creating a lesson plan, let’s see what all one should include in a lesson plan:
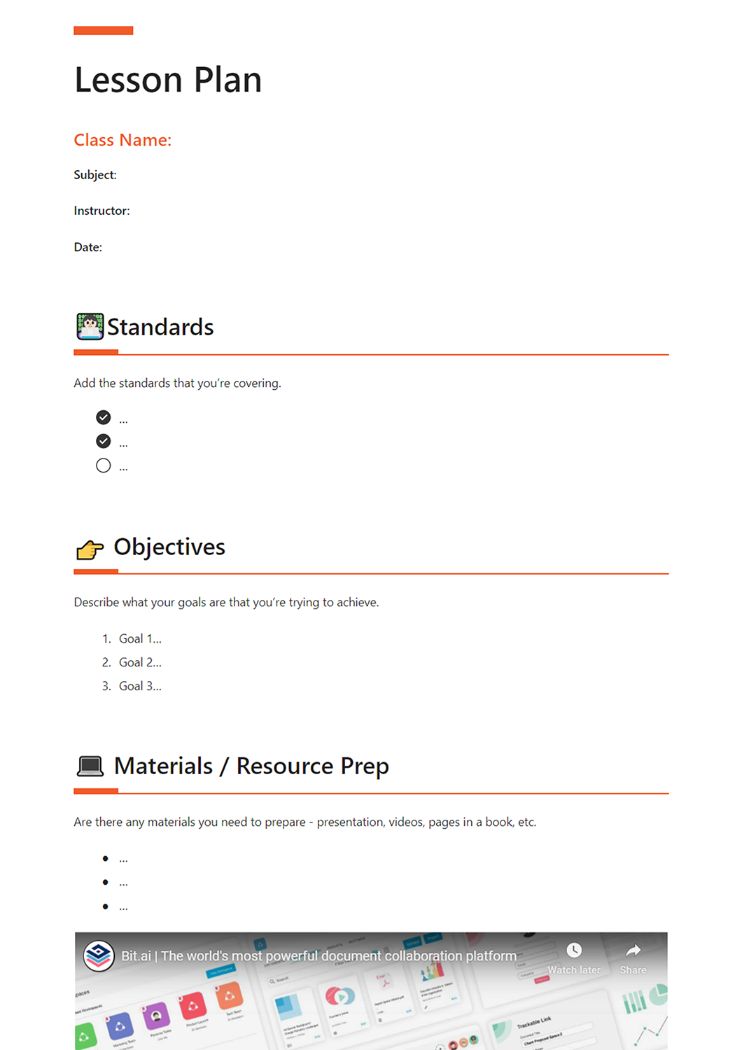
Step 1. Set up standards for the lesson plan
Add the standards that you’re covering. Setting standards for a lesson plan is a crucial way to maintain uniformity for the students who are learning as consistently as possible across classrooms and subjects.
Step 2. Plan the objectives
Describe what your goals are with regards to the class and what you’re trying to achieve. The goals of lesson plans must clearly be defined so that students can understand what is expected of them.
Step 3. Add helpful resource materials for the lesson covered
Incorporating new and exciting learning materials can boost classroom engagement and promote better learning. Make sure to include any materials that you think can help- you need to prepare – presentation, printouts, videos, pages in a book, etc.
Step 4. Mention lesson plan details
Make sure to describe your lessons in detail. It should specify detail about the content, Lesson objectives, materials, procedures for delivering instruction, student groupings, etc all in one place.
Step 5. Create lesson assignments or activities
Add any assignments or activities you would like your students to do. Ultimately assignments on a lesson are ways for students to evaluate their strengths and weaknesses academically as well as personally in that particular subject.
Step 6. Plan a quick Self-Evaluation
Take time at the end of the lesson to provide yourself with a quick evaluation. Think about what could have been better. or what more you can add to make the lesson plan more effective.
Step 7. Create lesson plan notes
Add any additional thoughts and notes on the next steps. Lesson closure notes offer an opportunity to reinforce student learning. These are useful for both students and instructors.
Read more: How to Write a Thesis with Perfection?
10 Mistakes to Avoid When Planning Lessons
Now that you’ve got the lesson planning steps covered down, let’s dive into the common mistakes teachers make during lesson planning and how you can avoid them to make your lessons even more effective!
#1. Starting Without Clear Learning Goals
Sometimes, teachers tend to hurry into a lesson without first outlining what students should take away from it. This can make the class feel aimless and leave students confused of what’s expected. Without specific goals, it’s tough figure out whether student are actually learning or not.
How to fix it: Always kick off your lesson by identifying what success looks like. Set clear, achievable goals that follow the SMART approach—Specific, Measurable, Achievable, Relevant, and Time-bound. Make sure you share these with your students at the start so they know what they’re aiming for and can keep track of their progress along the way.
#2. Trying to Cram in Too Much Information
It’s tempting to cover everything in one go, but trying to squeeze too much into one lesson can backfire. When lessons are overloaded, students tend to absorb less because they’re trying to keep up with the pace instead of really understanding the material.
How to fix it: Focus on the most important points and present them in a manageable way. Use a simple system like “must-know, should-know, nice-to-know” to sort through content. If there’s too much to reasonably cover in one sitting, don’t hesitate to spread it out across several lessons. Depth usually beats breadth when it comes to retention and engagement.
#3. Overlooking the Importance of Classroom Management
Even the best-planned lesson can fall apart if the classroom isn’t how it is supposed to be. Without clear behavior expectations, things can get off-track quickly, making it hard for anyone to focus.
How to fix it: Set your rules early and stick to them. Establish routines that help keep things predictable and use positive reinforcement to guide behavior. Engaging strategies—like call-and-response, signals, or structured transitions—can also help keep students on task. Treat classroom management as part of the lesson itself, not something separate.
#4. Assuming Students Are Already Prepared
It’s easy to overestimate what students already know. But when teachers move too quickly without checking for background knowledge, students may end up lost, which affects motivation and participation.
How to fix it: Do a quick check to see what students already understand before introducing new ideas. This could be a short discussion, a warm-up question, or a brainstorming session. Then, gradually build on that foundation with structured support, giving students a chance to grow into more complex tasks.
#5. Sticking Too Rigidly to the Plan
A lesson that’s too tightly structured can make students bored and leave little room for questions, deeper discussion, or curiosity. When students need extra time to understand a topic or want to explore something more deeply, a rigid plan can get in the way.
How to fix it: Leave space in your schedule for flexibility. Plan some buffer time and keep a few optional or simplified activities on hand in case things need to shift. Being responsive to students in the moment often leads to better learning than sticking rigidly to the clock.
Keep things neat and clear? this notepad template can help
#6. Focusing More on Teaching Than Learning
Some lessons are built around the teacher delivering content, rather than on what the students are doing with that content. If students are just sitting and listening, they may not be truly engaging or understanding.
How to fix it: Flip the focus. Make sure students are active participants—talking, collaborating, experimenting, and solving problems. Activities like peer discussions, debates, creative projects, and hands-on tasks turn a lesson into a learning experience. The more your students are doing, the more they’re likely learning.
#7. Skipping Formative Assessments
Waiting until the end of a unit to assess understanding can be risky. Without checkpoints along the way, you might not realize students are struggling until it’s too late to reteach effectively.
How to fix it: Work short, informal assessments into every lesson. Things like exit tickets, quick polls, group questions, or even a thumbs-up/thumbs-down check can give you real-time insight. These tools help you adjust in the moment and make sure no one falls behind unnoticed.
#8. Neglecting Smooth Transitions
Switching from one activity to another without a clear signal or explanation can confuse students and disrupt the flow. Disorganized transitions not only waste time but can also lead to off-task behavior.
How to fix it: Use consistent cues to let students know it’s time to shift gears—like a timer, a countdown, music, or a simple phrase. Explain what’s coming next and give students a moment to wrap up what they’re doing. Even something like a reflection question can help bring closure before moving on.
#9. Overlooking the Physical Environment
A messy or uninspiring classroom can make it harder for students to stay focused and motivated. The way the space is arranged can either support learning—or make it more difficult.
How to fix it: Set up the classroom in a way that supports your goals. Arrange desks so students can collaborate when needed, keep distractions to a minimum, and use your walls and displays to reinforce learning. Even small touches—like having good lighting and organized materials—can make a big difference in how well students engage.
#10. Skipping Lesson Review and Reflection
One of the most overlooked aspects of teaching is taking time to reflect on a lesson after it’s been delivered. When we don’t pause to think about what went well and what didn’t, we run the risk of repeating the same mistakes or missing out on chances to improve. Teaching isn’t meant to be static—it should evolve and get better with experience.
Create Lesson Plans The Right Way with Bit
Ready to make a lesson plan for your students? We have the perfect tool for you!
Bit.ai is a new-age online document collaboration tool that helps anyone create awesome recommended lesson plans, reading lists, notes, assignments, reports, and other classroom documents in minutes.
Bit is a dream tool for both students and teachers as it helps revolutionize classroom education and makes it more modern, fun, and interactive.

Some of the reasons why you should use Bit.ai in your classroom includes:
Immersive learning experience: Bit is used by teachers to create a media-rich lesson plan, reading lists, assignments, reports, and documents for their students to give them a more immersive learning experience than sharing boring text-only PDFs, Word/Google Docs, emails, etc. Users can add links to articles, books, YouTube explainer videos, images, spreadsheets, PDFs, podcasts, etc. to foster deep learning.
Workspaces to keep things organized: Students can use Bit as their digital notebook. Bit organizes files and documents into “Workspaces,” making it easier for students to keep files from different subjects into different workspaces.
Bit allows students to keep their class notes, assignments, report research, projects, and other resources organized in different folders and workspaces for easy access.
Real-time collaboration to foster co-learning: Bit supports real-time collaboration features that allow students and teachers to work together on assignments in real-time from the comfort of their homes.
With the presence of real-time chat, teachers can highlight and comment on Bit documents that need changes and provide feedback.
Some cool features of Bit include:
- Workspaces to organize notes and lists
- Real-time collaboration between students and teachers
- Document tracking provides teachers with the ability to see how many students have viewed their document, and how many have actually spent time reading it.
- Embed reading lists, syllabus information, additional resources, etc. on your school/university website.
Key Benefits of Making Your Lesson Plans on Bit.ai:
- Collaborate in real-time
- Interlink lesson plans and other documents
- Create fully responsive documents that look great on all devices
- Create lesson plans only visible to yourself or your classmates
- Track engagement on shared lesson plans with instructors, or projects shared with students, parents, etc.
Read more: Collaborative Teaching: What is it & How to Do it the Right Way?
Lesson Plan Template
As promised, here’s an awesome template for you to create lesson plans for your students and colleagues. Check it out below:

How to use the Lesson Plan Template with Bit?
The process of creating a lesson plan on Bit is insanely easy! Just follow these four simple steps to create a lesson plan quickly:
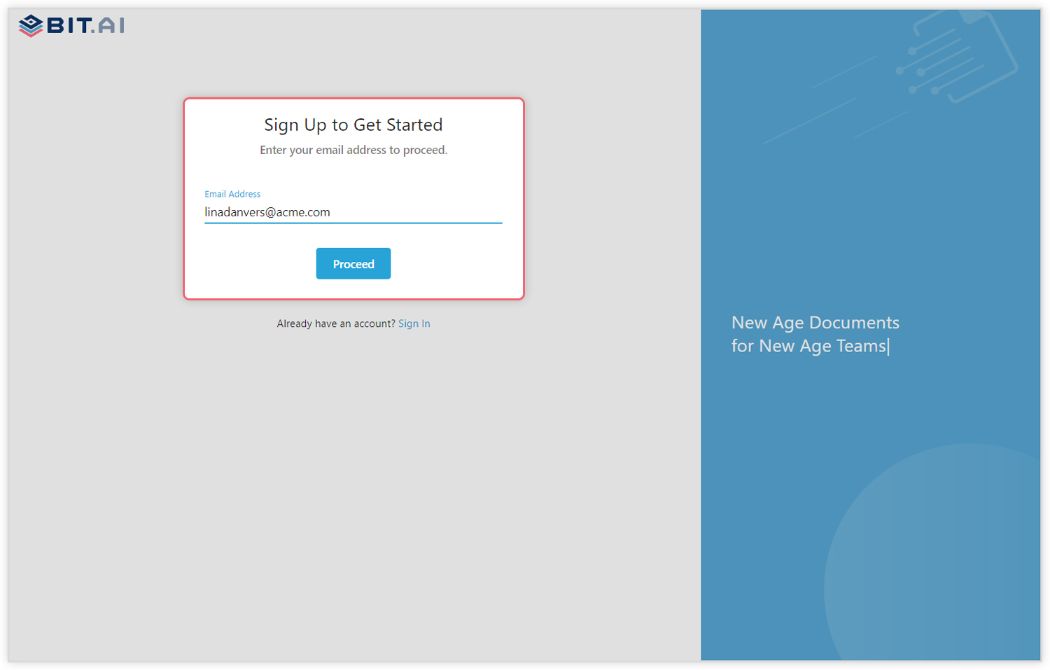
Step 1: Create a Bit Account
Go the home page of Bit.ai and click on Get Started for Free or Sign Up to get started. Enter your email address to sign up. Once in, you can create your personal profile.
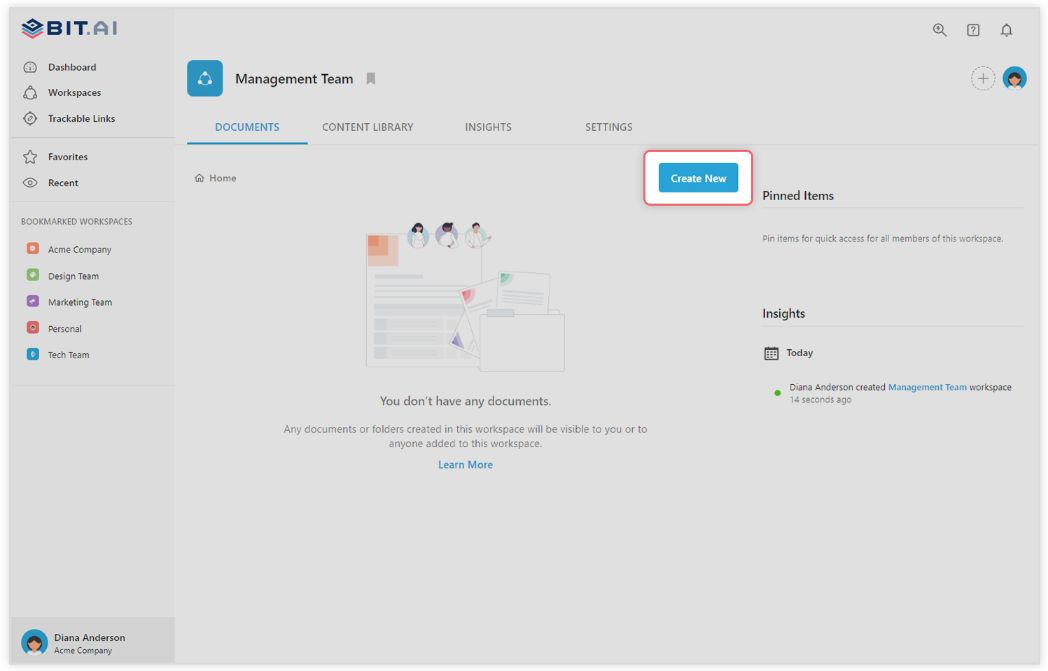
Step 2: Create a Workspace
Workspaces are where the work gets done. Click on the ‘Create Workspace’ button on the right. A popup will show up prompting you to add a name for your new workspace.
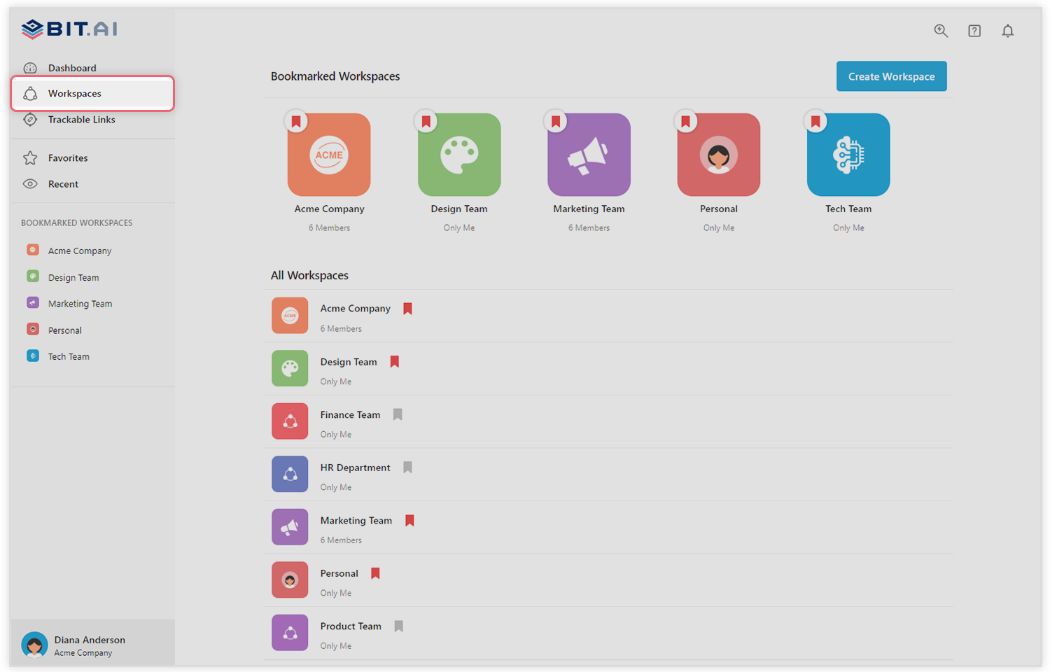
You can create a workspace around a team, department, large project, client, partner, etc. Inside each workspace, you can create an unlimited amount of Bit documents and access your content library (storage area for all of your digital assets – web links, files, cloud files, rich embeds, etc.).
Step 3: Add Team Members
Bit allows your team members to collaborate in real-time and get work done. Collaboration starts at the workspace level.
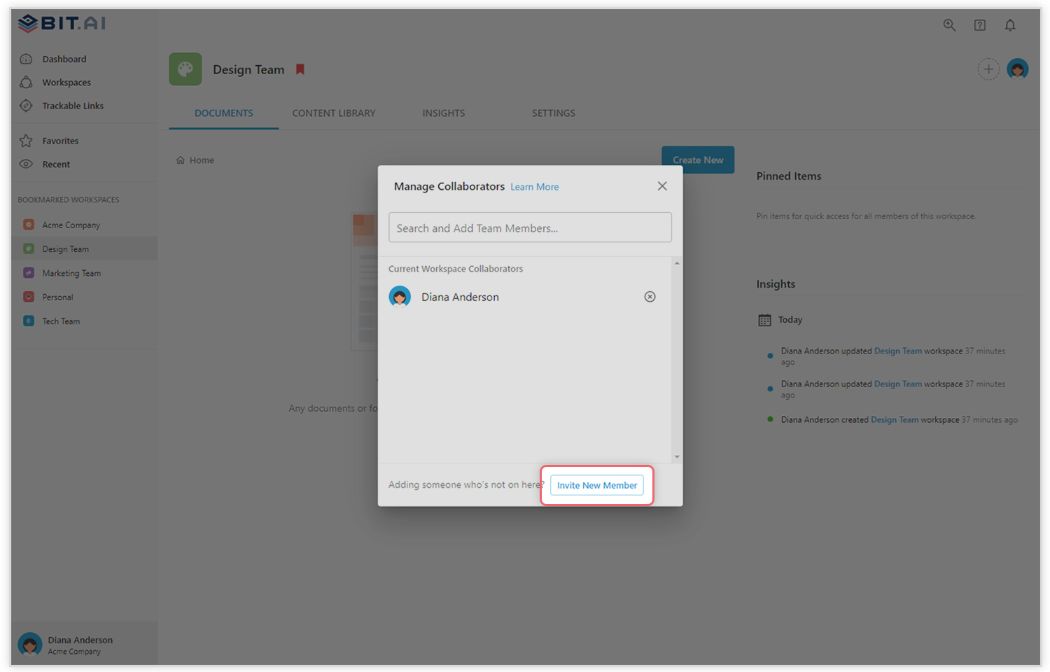
You create private workspaces by default. However, you can invite others to join you inside of a workspace and collaborate together with the knowledge, projects, documents and content inside of the workspace.
Step 4: Create Your Desired Document
Once you are in the workspace, click on the ‘Create New’ button. Select ‘From Template’ in the dropdown. A pop up will display allowing you to select a template from the gallery.
In the search box on the top left corner, you can search for “Lesson plan template”. Once your desired template pops up, click on it and click on the “Use Template” button on the bottom right corner.
That’s it! Your lesson plan document is ready for use!
Bonus Resource: Looking for an easy way to create exams? Try our AI exam generator
Over to you!
To make your job easier, use a lesson plan template. We have created an awesome lesson plan template for you including all the key elements one needs to include in a lesson plan, so there’s no need to start from scratch. Simply make a free account on Bit and start creating your lesson plan today!
Moreover, Bit provides a centralized location to create, store, and share reading lists and other classroom documents like class notes, projects, assignments, research, etc.
With real-time collaboration, Bit also acts as a distance learning tool, helping teachers and students collaborate remotely. If you need any help with our education templates, let us know by tweeting us @bit_docs. Cheers!
?Watch this video to learn more?
Further reads:
- How To Create A Recommended Reading Document?
- How to Create an Amazing Study Guide?
- Best Homeschooling Apps and Tools to Educate Kids!
- How To Write A Letter Of Recommendation
- How To Create Class Notes Worth Reading!
- 12 Best Student Tools for Better Learning!