If you’re a software developer, chances are documenting design requirements isn’t your favorite part of the job. It must be way more exciting to just jump right into the code, right? However, avoiding this step can make the situation worse than solving it.
Team members can easily lose the beat without proper documentation. And in the case of working with clients, the mismatch in deliverables has the potential to cause last-minute misunderstanding or hold-up. Nobody wants that!
That’s why having a clear and well-structured software design document (SDD) matters. It keeps everyone involved—developers, designers, clients, and stakeholders—aligned from the very beginning.
In this article we will be talking about how you can use the best AI tool for generating the perfect software design document! We will also be sharing with you our ready-to-use software design document template and discussing the Software Design Document Example. But before that let’s first break down what an SDD is and what it should include to truly make your life easier.

If this was useful, read this…
What is a Software Design Document (SDD)? (Definition)
A software design document, or SDD for short, is kind of like a blueprint for your software project. Some people also refer to it as a software design specification or technical specification. Whatever the name, its job is the same: to clearly explain how a software system is supposed to be built.
Usually, these documents are compiled by software designers or project managers and shared with the development team so everyone’s on the same page before the real work begins. Think of it as the go-to guide for what needs to be done and how to do it.
The best part? A good SDD keeps the confusion away. It spells out what the software is meant to do, how it will accomplish this, and what the overall picture looks like. When done right, it makes complex tech stuff a lot easier for the whole team to understand.
A majority of SDDs are structured in a clean and well-organized manner with technical requirements simplified in a logical manner. It is all about bringing big ideas into simple, approachable action plans so that your team moves in the right direction.
Having learned what an SDD is, we can now examine why it is such a critical part of the development puzzle.

Turn your ideas into clear, collaborative Software Design Documents with Bit.ai. Try it now!
Free to start • Set up in minutes
Importance of SDD in Software Development
Building software without a proper design document is like trying to assemble a complicated machine without instructions. Sure, you might eventually get there, but it’s going to be slower, more frustrating, and full of avoidable mistakes.
A Software Design Document (SDD) lays down a solid foundation for your entire project. It helps ensure that everyone involved — from developers and designers to stakeholders and clients — is on the same page about what the system is, how it works, and what the end goal looks like.
It acts as a shared blueprint that keeps large teams aligned, eliminates confusion, and provides a clear direction throughout development. No second-guessing or last-minute surprises.
Creating an SDD also gives you a chance to think through all the moving parts. You’re able to catch potential issues early, plan for technical challenges, and build smarter solutions right from the start.
Even after launch, a good SDD continues to pay off. It becomes a go-to guide for onboarding new team members, updating features, or revisiting older decisions.
Thinking about the future of coding?
You should know these AI insights for developers. →
Clearly, It is not possible to skip SDDs. But what ought to be put in one? Here comes our essential elements!
7 Essential Software Design Document (SDD) Elements
Any successful major development project starts with a strong foundation, and this foundation can very well be your Software Design Document (SDD). It is like the roadmap to your project. Any successful major development project starts with a strong foundation, and this foundation can very well be your Software Design Document (SDD).
It is like the roadmap to your project. It gives direction to developers and balances the interest of various stakeholders as well as keep them on the same track as they go along. The creation of a great SDD would also facilitate the removal of ambiguity and help speed up the onboarding procedure, as well as greatly simplify future updates. So what makes it a great one? Let us go through the main points:
#1. Introduction
This is where it all begins. Use this section to define the purpose and scope of the document and who it’s intended for. It should quickly clarify why the SDD exists, how it fits into the overall project, and reference any supporting materials, like requirement specs or business goals.
#2. Overview and Purpose of the Project
Give your reader a simple, big-picture look at what the project is all about. What will the software accomplish? What particular problem will it address? In this section, briefly describe some of the major highlights, what outcomes you anticipate, and an approximate timeline and key milestones. It prepares the expectations upfront.

PRO TIP
A strong project summary sets expectations—keep it sharp and focused.
#3. System Functionality
Break down what the actual software is going to do. List the features, describing them and putting them in modules or components, as appropriate. Describe how people are going to interact with it using user stories or use cases to give a clearer picture. This assists both the technical and non-technical reader to comprehend its practical use.
#4. Architectural Design
This is where you demonstrate how it all comes together. Include architectural diagrams to depict the structure of your system. Describe the style of architecture you’ve chosen — for instance, is it microservices-based or client-server? Then explain how different parts of the system communicate and share data. This section serves as a visual and written guide for developers.
#5. Detailed Design
Go through each of the architectural components and go in-depth. Talk about classes, data structures, algorithms, and design patterns. Be as specific as you can. By now, your documentation should be capable of making a developer start his work without further information being required.
#6. User Interface (UI) Design
Let’s discuss visuals. Add wireframes or mockup to display the appearance and functioning of the software. Explain navigation, design and major screen actions. Focus on usability and accessibility always: a friendly, clean interface is a make or break when it comes to user experience.
#7. Error Recovery and Handling
Things get screwed up. That goes without saying. Explain how you intend to handle errors in your system in this section. Explain client and server-side plans such as retries, fallbacks, and user-messages. Good thinking on this part will result in an improved and more stable user-friendly product.
All the sections we discussed above are essential to maintaining your technical documentation consistent and keeping yourself and your team on track. To bring everything in perspective, let us now address the major advantages.
Read this now:
Project Sample Design Document
Have you ever wanted some ready-made blueprint to work on complex projects and you are ready to kick off? That is what a sample design document provides. It can be viewed as a cheat sheet that you can tailor to your interests, tech stack, and goals of your project.
We have compiled a general software design document template to aid you to start on the correct footing. This sample provides a good base regardless of whether you are developing a web app, a new feature, or an enterprise-level tool.
So here is what you will get inside:
- Examples based on real life illustrating how each section is to sound and appear
- Guidelines and recommendations of clear, technical writing
- A list of mistakes to avoid that you do not slip into the common traps
- Diagram, flowchart, and architecture map templates to keep it visual and easy to comprehend
No more formatting a new document and guess work on what to include. This sample walks you through the right structure so your team can focus on the code instead of getting lost in the documentation.
Let’s move on to how you can actually create your software design doc using Bit without breaking a sweat.
Don’t forget:
Invest time in creating clear API documentation today, and save days of confusion tomorrow.
How to Create Software Design Documentation with Bit.ai?
Creating a Software Design Document (SDD) might sound like a lot of work, but Bit.ai, the world’s smartest AI-powered platform, makes the process fast, simple, and even a little fun. Its AI Genius writing assistant helps you generate ideas, refine text, and structure your content effortlessly. You can also collaborate in real time with teammates, organize everything into workspaces, and embed rich media like videos, charts, or cloud files to make your document more engaging.
FREE TEMPLATE
The Software Design Document Template Engineering Teams Actually Use
Includes system architecture, component design, workflows, integrations, diagrams, approvals, & version control.
✔ Pre-filled sections
✔ Edit once. Reuse forever.
✔ Engineering, Product & DevOps Friendly
Takes under 1 minute • Trusted by teams at startups & enterprises
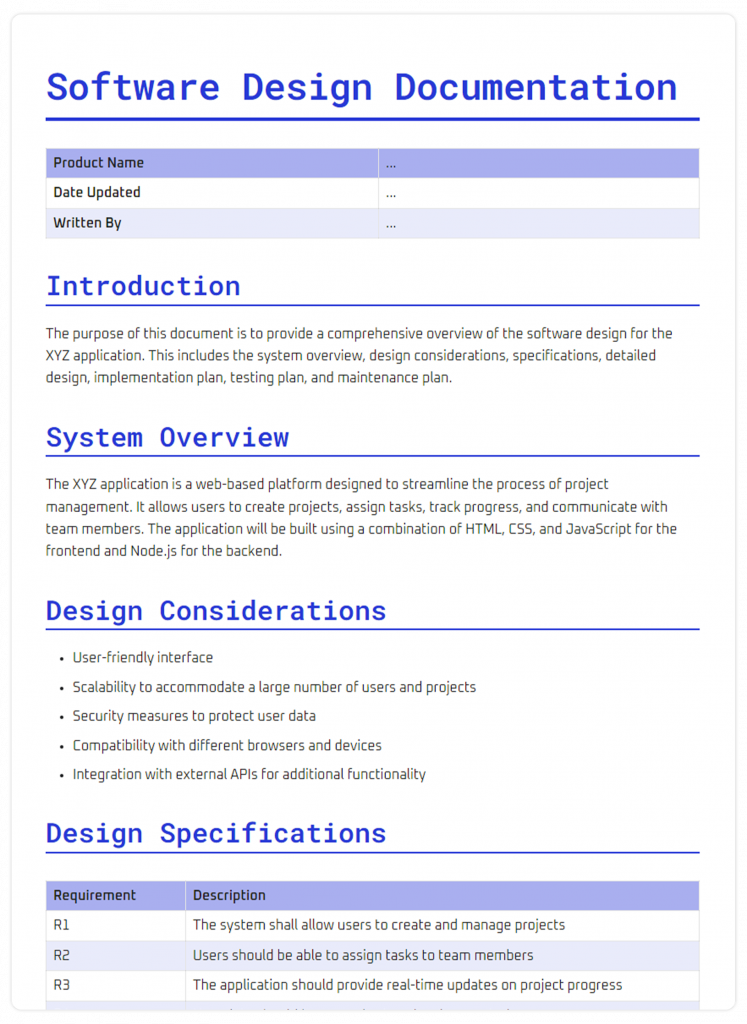
Option #1: Use Ready-Made SDD Template
This is the fastest way to dive into it, should you wish to do so. Bit has a ready-to-use, professionally designed Software Design Document Template. All you need is to just plug in your content, you may update the project details, and you are ready to go. It has all the structure, formatting, and heading,s so you are just left to write rather than spending time rebuilding the layout.
This is perfect if you already know what you want to say and just need a clean, organized space to say it.
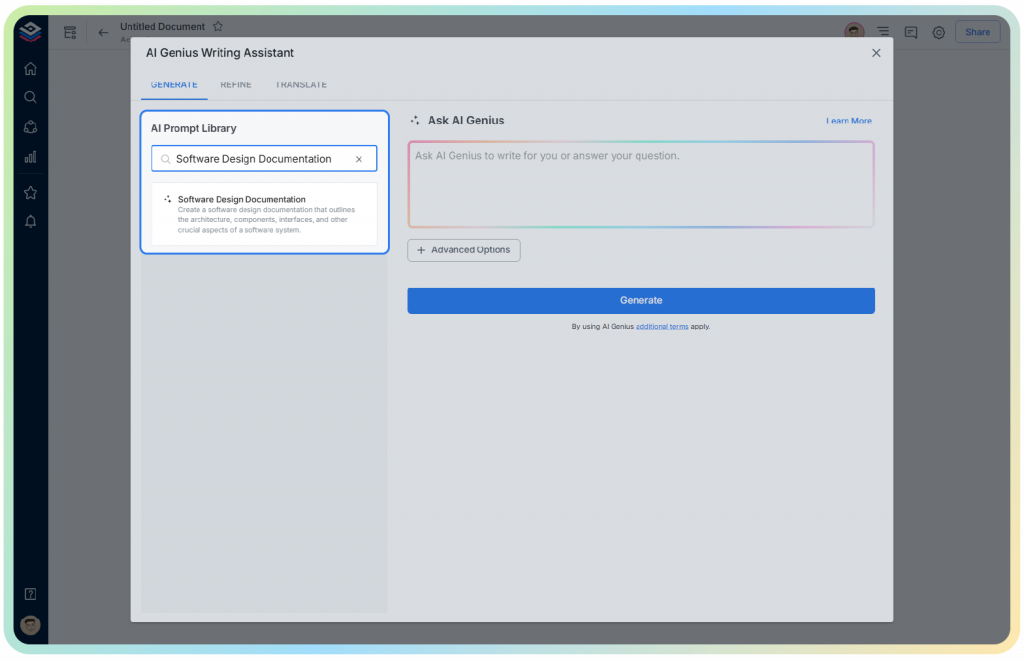
Option #2: Use Bit’s AI-Powered SDD Template
Want a more intelligent head start? The AI Template Generator by Bit can make you a full Software Design Document in a few seconds. Simply provide some information about your project, and within moments the AI will create a custom document structure and even suggest what to include in it. It’s a huge time-saver and especially helpful if you’re not sure where to begin or want guidance on what to include.
Now, Let’s Walk Through the Steps to Build Your SDD on Bit.ai
Regardless of the choice you make, starting out is quite easy. Here’s how:
Step 1: Sign up for Bit Account
Visit Bit.ai and press on ‘Get Started for Free’ or ‘Sign Up’. Fill in your e-mail address, create your profile, and you are ready to go.
Step 2: Set up the Workspace
This is where you will do your project. Hit create workspace, name it according to your project, team, or client, and you can begin to build.
Step 3: Add Team Members
Have to work together? Add your colleagues to the workspace. Anyone is able to make inputs in real time. It is like Google Docs with enhanced features and a sleeker experience.
Step 4: Craft Your Doc
Click on Create New and select From Template. Use a search engine to search; enter Software Design Template and pick a template that best suits your project and edit away.
Step 5: Personalize using Smart Features of Bit
Regardless of the template you choose, either the ready one or the AI one, you will be provided with the pre-filled helpful sections, format, and example content. You can easily adjust the text, layout, and structure to match your voice and project goals without struggling with design or formatting issues.
Want to take it further? You can personalize your SDD by refining the tone of the language, describing your target audience, adding keywords, and so much more.
Awesome, right?
Next up: Now, let us discuss the main advantages of writing your Software Design Document in Bit.
If this was useful, read this…
Advantages of making your Software Design Document with Bit.ai
You are now aware of the necessity of a good Software Design Document. But what if designing one could also be fun? And that is what Bit.ai makes achievable. Here are some of the standout features that make Bit.ai the best place to build your SDD. Let’s take a look!
- Seamless Collaboration with Your Whole Team- Need input from your product manager, QA engineer, or developer? Bit makes it easy for everyone to collaborate in real time. You’ll never have to deal with confusing email threads or multiple document versions again. The editor is distraction-free and straightforward, so your team can focus on writing great content rather than spending time on formatting.
- Markdown Magic-If you love using Markdown, Bit makes the experience even better. You can use Markdown shortcut keys to format text quickly without using your mouse. It’s fast, smooth, and keeps your workflow efficient. Bit also supports importing Markdown content and exporting documents in Markdown, PDF, or Word formats. So you can easily move content between platforms whenever needed.
- Professional and On-Brand Design- Your documents don’t just function well. They look great, too. Customize with your brand colors, add your logo, and use ready-made templates to create polished, consistent documents without needing any design skills.
- Apply Custom Permissions- Some documents are meant for the whole team. Others are more sensitive. Bit gives you full control over who can view, edit, or comment on each document. You can set permissions, track activity, and even add a password to protect important files.
Bit.ai gives you everything you need to create professional, easy-to-manage software design documents. Now that you know the benefits, let’s explore how to build one.
Wrapping Up
And there you go. All the information you need to write a clear, professional, and effective Software Design Document is now literally just a few clicks away.
SDD writing is certainly not the most exciting aspect of the development process, but it is among the most crucial. It keeps your team on track, keeps your goals in line, and keeps your project on track.
With Bit.ai this is made so much simpler. You can select an existing template or get started with Bit and its AI-powered technology to have a solid base to work with. Features such as real-time collaboration, code blocks, Markdown support, smart formatting, and secure sharing, allow you to maintain your documentation as clean, consistent, and simple to manage.
If you’re looking to streamline your workflow and create solid, smart documentation without the stress, Bit has everything you need to make it happen.
Now it’s your turn. Open up Bit, pick your template, and start building something amazing.
Few technical documents templates you might be interested in:
- API Documentation
- Product Requirements Document Template
- Software Requirements Document Template
- UX Research Template
- Issue Tracker Template
- Release Notes Template
FAQs
- Why should a Software Design Document be important?
An SDD is a development blueprint that synergizes teams, reduces misunderstandings, and can serve as a source of reference for updates and maintenance. It also aids in detecting problems before they lead to greater wastage. - What is the distinction between SDD and SRS?
Some detail what the software ought to do (requirements), and an SRS defines that. Other details include how the software is to be constructed (architecture, components, and implementation strategy) and the SDD details. - Who is the user of Software Design Documents?
Developers, project leaders, QA specialists, system architects, and stakeholders utilize SDDs to enable the implementation, administration, and evaluation of the project’s technical direction. - What is the best structure of an SDD?
Any good SDD must include an introduction, project description, architecture notice, technical specifications, data flow, user interface considerations, testing notes, and appendices where additional information is provided. - To what extent should it be detailed?
It must be written in such detail that developers can proceed with developing the system without constant clarification, but it must be clear enough to be readable by non-technical readers. The complexity of the project guides the depth needed.
If this was useful, read this…
- Software Development Process: Steps To Follow →
- Technical Report: What is it & How to Write it? (Steps & Structure Included) →
- Technical Description: What is it & How to Write it? (Steps Included) →
- Test Plan for Software: What, Why, and How to Write It? →
- Top 11 Code Editors for Software Developers →
- Software Product Development: A Comprehensive Guide →