Teachers face the daily challenge of managing an array of resources and documents essential for classroom instruction. The sheer volume of paperwork can sometimes overwhelm even the most organized educators, from lesson plans to handouts, from reference materials to assessment tools.
Moreover, the need to share these materials effectively with students adds another layer of complexity to the mix. Traditionally, this has meant relying on paper handouts, photocopies, and physical textbooks.
However, there’s a compelling argument for embracing digital solutions in an age where technology permeates every aspect of our lives. But what if there was a solution that could streamline this process, making it more efficient and engaging for both teachers and students alike?
Wikis are collaborative websites that allow users to create, edit, and organize content in real time. Think of them as digital notebooks where information can be easily accessed, updated, and shared with just a few clicks.
Gone are the days of endless stacks of paper and misplaced handouts. With wikis, everything you need for your classroom can be neatly organized and readily available.
In this blog post, we’ll explore the practical applications and benefits of using wikis for education in classrooms. Let’s get started.
How to Use Wiki For Education with Bit.ai?
Studies have shown that students actually prefer digital learning materials. A report by Pearson found that 71% of students engaged more with digital course materials than traditional textbooks. In this case, clinging to paper-based learning feels like clinging to the past.
So, it is high time educators start adopting digital knowledge solutions like wikis. But what if you think, “Wikis sounds great, but where do I even begin?” Don’t worry! This guide will walk you through creating a wiki for your educational needs.
Step 1: Choose a Platform
When it comes to using wikis for education, the first and most crucial step is choosing the right platform. With so many options available, this can seem overwhelming. However, by focusing on your specific needs as an educator, you can narrow down the choices and find the perfect platform for your educational requirements.
Start by considering the tools and features that are essential for your educational activities. An ideal platform should be easy to use for both educators and students, ensuring that everyone can contribute without any hassle.
Clear permission roles are vital, as they allow you to control who can edit, view, or manage the content. This is especially important when dealing with sensitive information or when you want to maintain a structured and organized environment.
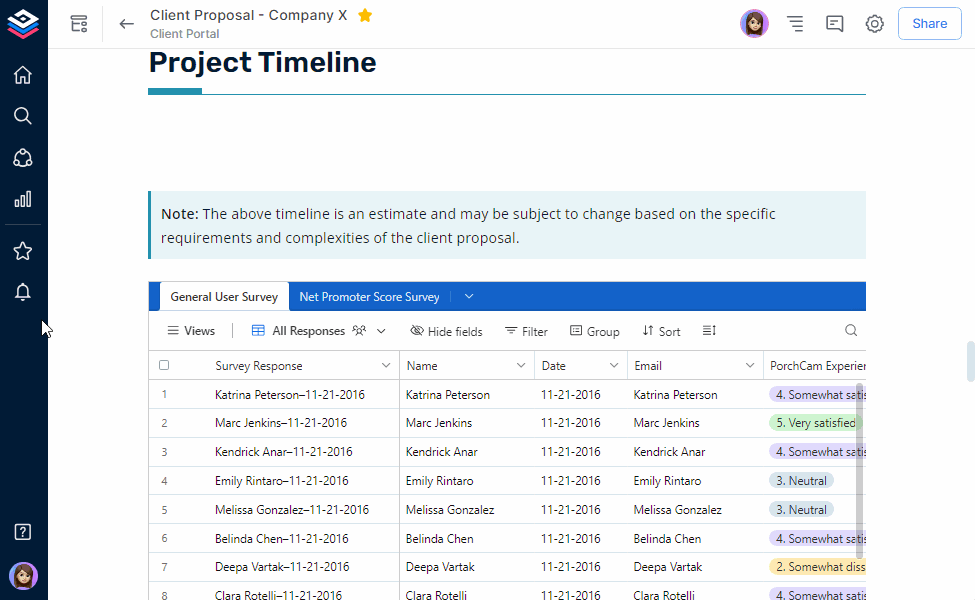
Robust search functionality is another key feature. As you create and accumulate a large number of resources, the ability to quickly find specific content becomes crucial. Look for a platform that offers efficient search tools to make information retrieval a breeze.
Additionally, multimedia integration is a must-have. The platform should allow you to seamlessly incorporate videos, images, and other multimedia elements into your wiki pages, enhancing the learning experience.
Finally, clear organization is essential for maintaining a user-friendly and effective wiki. The platform should support intuitive navigation and content categorization, ensuring that students can easily find the materials they need.
Considering all these requirements, Bit.ai stands out as the perfect platform for educational purposes.
Bit.ai is an AI-powered wiki and document collaboration tool that simplifies knowledge creation, search, and collaboration. Its intuitive interface and powerful features make it easy for teams to create, edit, and share documents in real-time. It is designed with educators and students in mind.
This guide will walk you through creating a wiki while introducing you to some helpful Bit.ai tricks! Let’s continue.
Read more: Best Teaching Resources Transforming Classroom Learning!
Step 2: Create a Workspace
On the dashboard, you’ll see an option to manage your workspaces. Look for the “Add Workspace” button, typically located prominently on the dashboard. Click on this button to begin creating a new workspace.
A workspace in Bit.ai serves as a virtual hub where you can store and organize information. It’s crucial to name your workspace clearly and concisely, reflecting its purpose. For example, you might name a workspace “Grade 9 History” or “Science Department Resources.”
When creating a workspace, consider its purpose. Is it for a specific class, a departmental collaboration, a project, or a team effort? Bit.ai allows you to create various types of workspaces tailored to your needs:
- Private Workspaces: Ideal for sensitive information or personal projects.
- Educational Workspaces: Perfect for classrooms, allowing teachers to share resources and assignments.
- Project-Based Workspaces: Useful for managing specific projects with timelines and deliverables.
- Team-Based Workspaces: Facilitates collaboration among different members of a team or department.
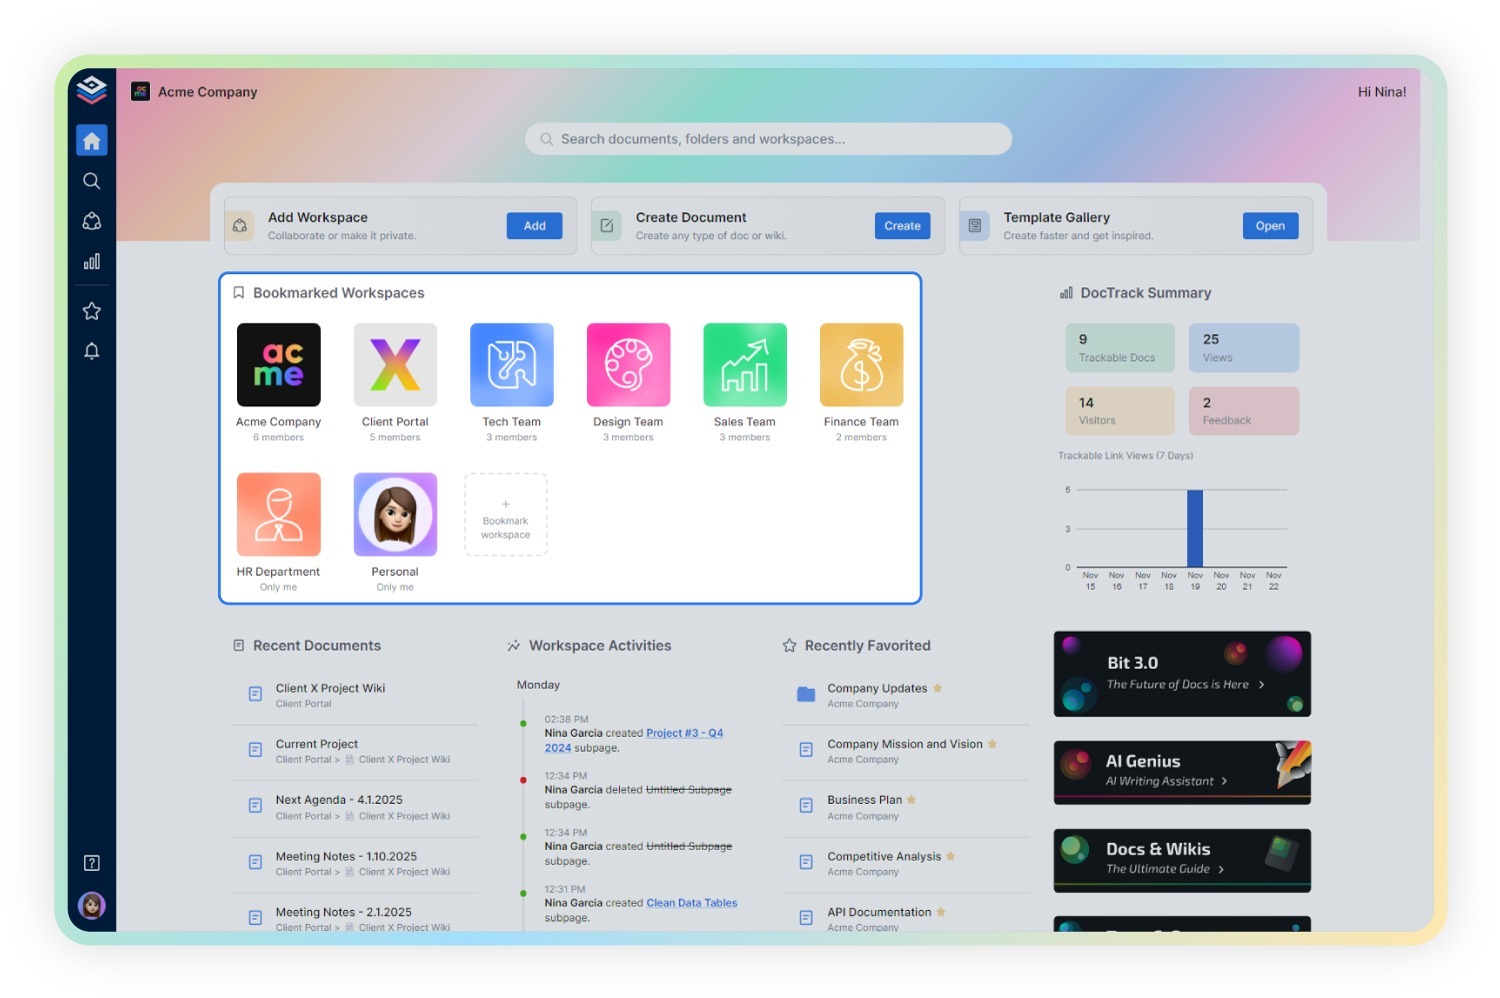
Bit.ai offers an asset library where you can pre-upload digital assets like images, documents, and videos. This feature is incredibly useful as it saves time and ensures that all necessary resources are readily available for use.
Use Workspace Activities – Bit.ai provides valuable insights into your workspace activities. You can view metrics such as the number of documents, users, and guests in the workspace. Additionally, recent activity logs detail changes and updates, helping you keep track of progress and contributions.
Read more: Ultimate Education Template Guide For Modern Educators
Step 3: Onboard Students
Once you’ve set up your workspace on Bit.ai and created your educational content, the next crucial step is onboarding your students. Getting your students involved and comfortable with the platform will ensure they can fully benefit from the resources you’ve prepared. Here’s how you can onboard your students effectively:
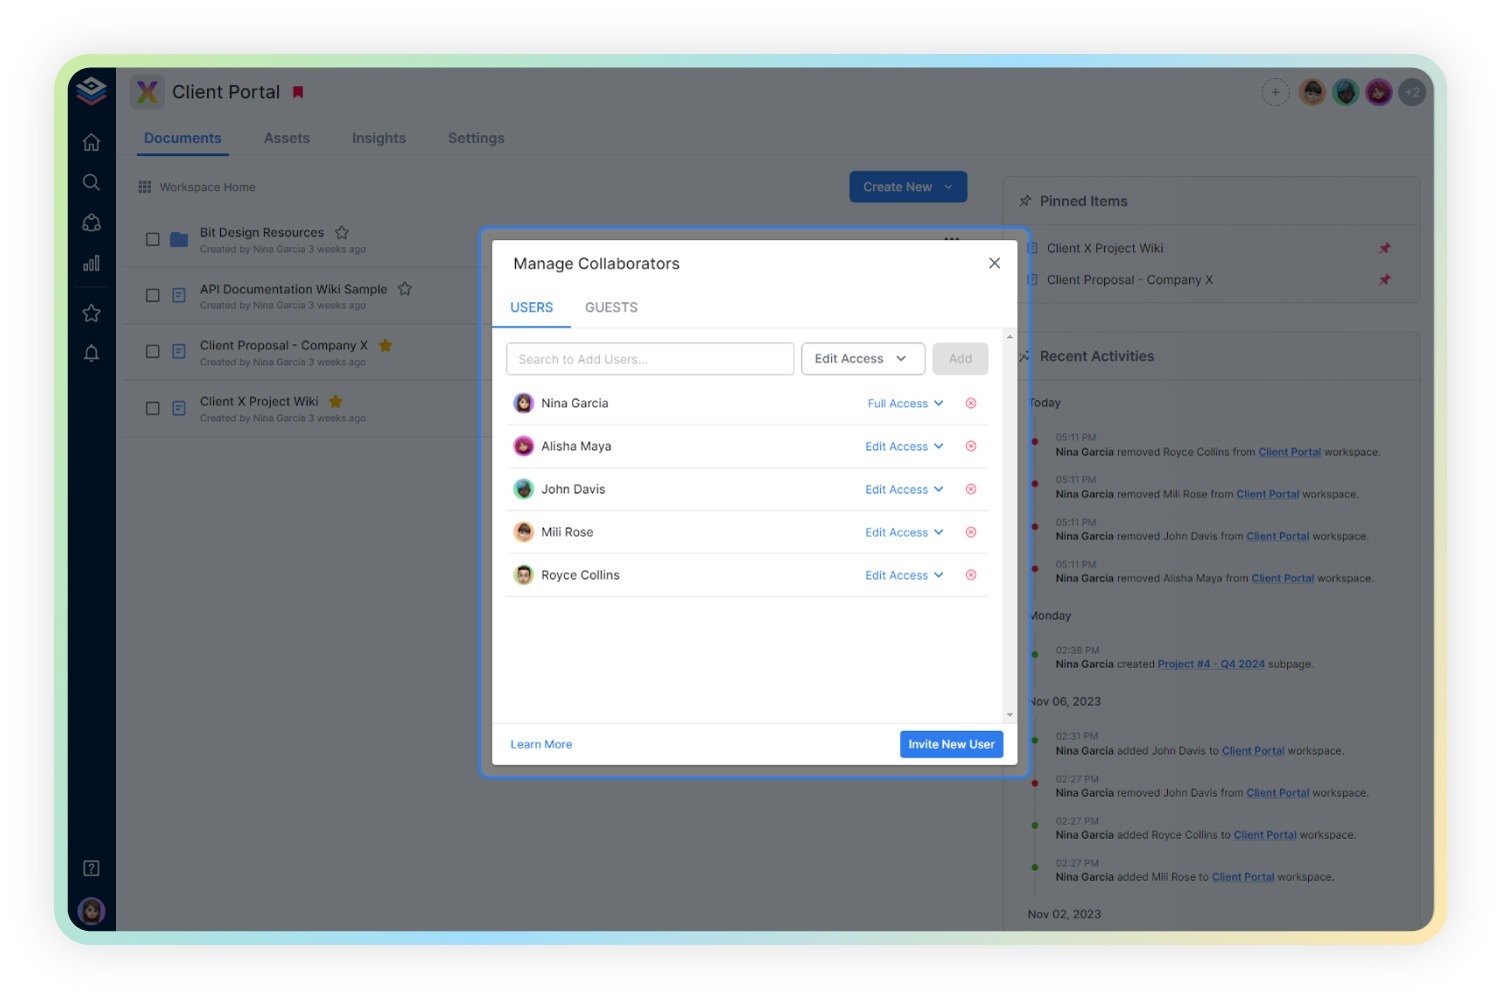
- Select the Appropriate Workspace: Navigate to the “Workspaces” section and choose the workspace you’ve set up for your class.
- Find the Add Collaborators Option: Look for the option to add collaborators, which is typically represented by a ‘(+)’ icon or found within the “Settings” tab.
- Open the Collaborator Pop-up: Click the add collaborators option to open a pop-up window.
- Enter Email Addresses: Click “Invite New User” and enter the email addresses of your students.
- Specify Workspaces if Needed: If your workspace includes multiple sections or subjects, specify the relevant ones for each student.
- Dispatch the Invites: Click “Send Invitations” to send the invites to your students. Once they accept the invitation, they will automatically be added to the workspace.
After entering the email addresses, you’ll have the option to assign a role to each student. Bit.ai offers four different permission levels, each tailored to specific needs:
- Full Access: This level is typically for co-teachers or teaching assistants who need to manage documents and invite others. Students generally don’t need this level of access.
- Edit Only: Suitable for students who will be actively participating in document creation and editing.
- Comment Only: Ideal for students who need to review and provide feedback on documents without making direct changes.
- Read Only: Perfect for students who only need to view the materials and complete assignments without editing capabilities.
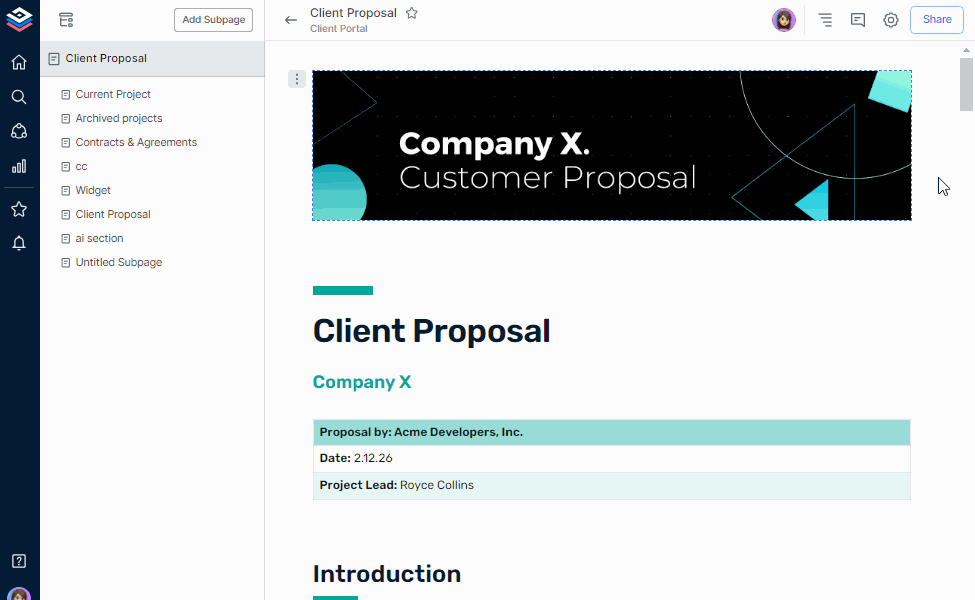
Step 4: Start Creating Study Material
Now that you’ve set up your wiki and added your team members, it’s time to make it come alive! Creating engaging and informative study materials is essential for a successful educational experience.
Bit.ai offers a variety of tools and features to make your document creation process efficient and enjoyable. This guide will walk you through the steps to create comprehensive study materials using Bit.ai, tailored specifically for educators.
1. Smart Living Documents
Bit.ai’s smart documents are interactive and designed to enhance your documentation needs. Unlike traditional static files, these documents can integrate various digital content types within a single platform, making them more dynamic and engaging.
2. Real-Time Collaboration
With Bit.ai, multiple collaborators can work on the same document simultaneously. This feature ensures that everyone is on the same page and can contribute in real time. You’ll receive instant notifications when someone mentions you or leaves a comment, making collaboration smoother and more efficient.
Read more: Digital Classroom Collaboration: Role in Modern Education
3. Smart Editor
Bit.ai’s smart editor simplifies the formatting process. Instead of dealing with cluttered toolbars, you can highlight the text you want to format, and the options will appear right where you need them. You can easily apply bold, italics, strikethrough, headings (H1-H6), highlights, and more. This feature makes it easy to create professional-looking documents without hassle.
4. Smart Widgets
Enhance your documents by incorporating Smart Widgets. These allow you to integrate images, files, tables, code blocks, and other digital content seamlessly. Each piece of digital content can be previewed directly within the document, eliminating the need to open files separately and keeping your workflow smooth.

5. AI Genius Writer
Bit.ai’s AI genius writer is a powerful tool for generating content. Whether you need help brainstorming ideas, writing detailed guides, or creating customizable templates, AI Genius is at your service.
Simply type ‘@’ followed by your query, and the AI will assist you. The responses are automatically formatted to match your document’s theme, saving you time and ensuring consistency.
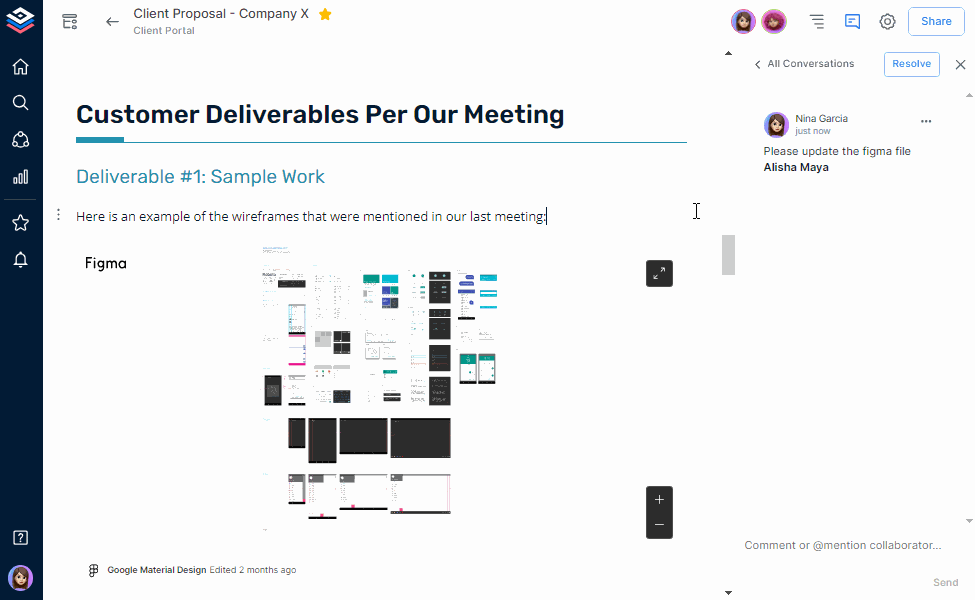
6. Inline Comments and @Mentions
Bit.ai makes communication within documents straightforward with inline comments and @mentions. You can highlight the text you want to discuss, add a comment, and notify your collaborators with just a few clicks.
This feature is particularly useful for providing feedback, asking questions, and engaging in discussions.
7. Version History
Never worry about losing important changes or making irreversible mistakes. Bit.ai’s version history allows you to revert to previous versions of your document and view who made changes and when. This feature acts like a time machine, giving you peace of mind and control over your content.
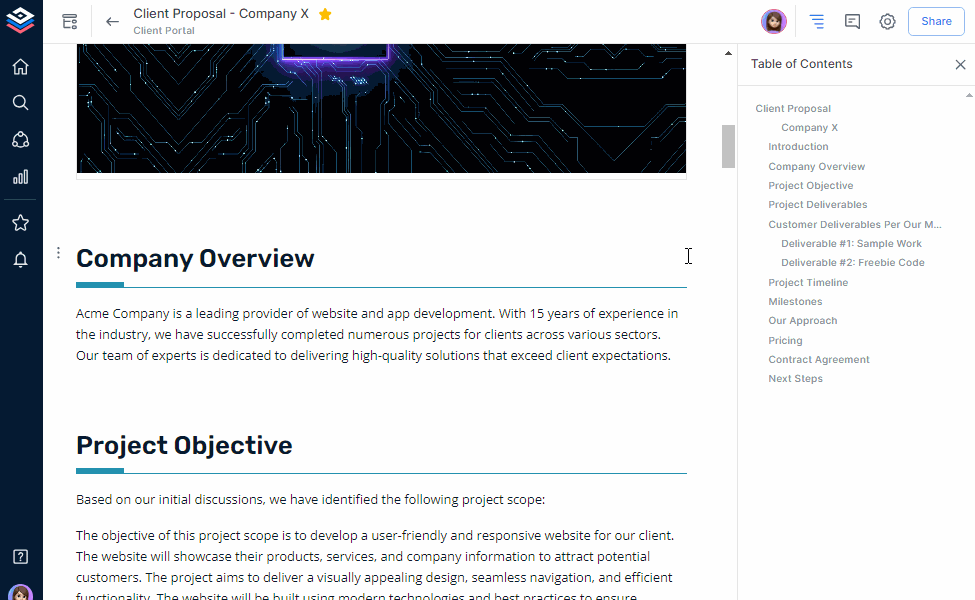
8. Table of Contents
A dynamic table of contents is automatically generated and updated as you add or edit headers (H1-H3) in your document.
This feature helps you and your students navigate the content effortlessly. You can also create hyperlinks within your document for easy reference, ensuring that important sections are always accessible.
Step 5: Organize the Data
Now that you have gathered your educational content, it’s time to organize it effectively. Proper organization is crucial for making information easily accessible and ensuring a smooth learning experience for your students.
Here’s how you can use Bit.ai to turn your content into a well-structured educational wiki.
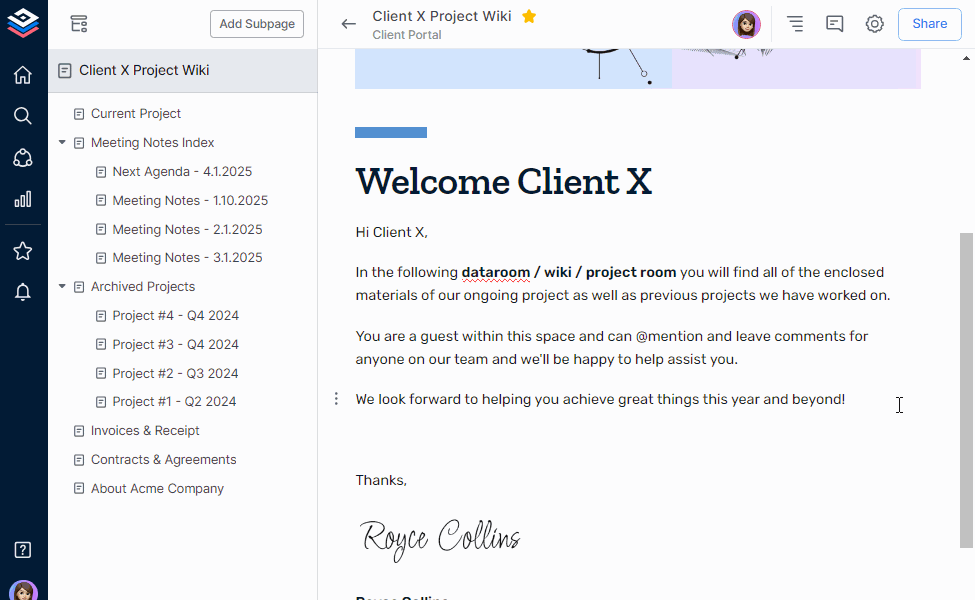
- Create a Structured Wiki One of the standout features of Bit.ai is its ability to transform documents into a structured wiki. This means you can create an organized, easy-to-navigate format for your educational content. Start by creating main pages for broad topics and subpages for specific subtopics. This hierarchical structure helps break down complex information into manageable sections.
- Smart Search for Quick Access The smart search feature in Bit.ai is a game-changer for finding specific information quickly. Located on the left bar, the search tool lets you search across workspaces, folders, document titles, and even content within documents. This means you can locate exactly what you need without wasting time scrolling through endless pages.
- Use Folders and Subfolders Organize your content further by using folders and subfolders. For instance, if you’re teaching a course on Biology, you can have a main folder for the subject and subfolders for each chapter or module. This approach keeps your data tidy and ensures that students can easily find the materials they need.
- Utilize the Navigation Panel Bit.ai’s navigation panel is an essential tool for exploring your wiki. It allows you and your students to move seamlessly between different sections and subpages. You can use unlimited hierarchy to rearrange the order of pages; simply hover over a page, click, and drag it to the desired location. This flexibility ensures that your wiki remains logically organized and easy to follow.
By following these steps, you can transform your educational materials into a well-organized, interactive, and easily navigable wiki using Bit.ai. This not only enhances the learning experience for your students but also streamlines your teaching process, making it more efficient and effective.
Read more: Best Wiki Software and Tools for Teams (Free & Paid)
Step 6: Share & Track Engagement
In today’s digital learning environment, sharing and tracking engagement with educational resources is crucial for success. Bit.ai’s platform offers powerful features to help educators share their knowledge and track its use.
Step 6 in using Wiki for education with Bit.ai focuses on using these sharing and tracking tools to enhance collaboration and improve the learning experience. Let’s explore how educators can make the most of these features.
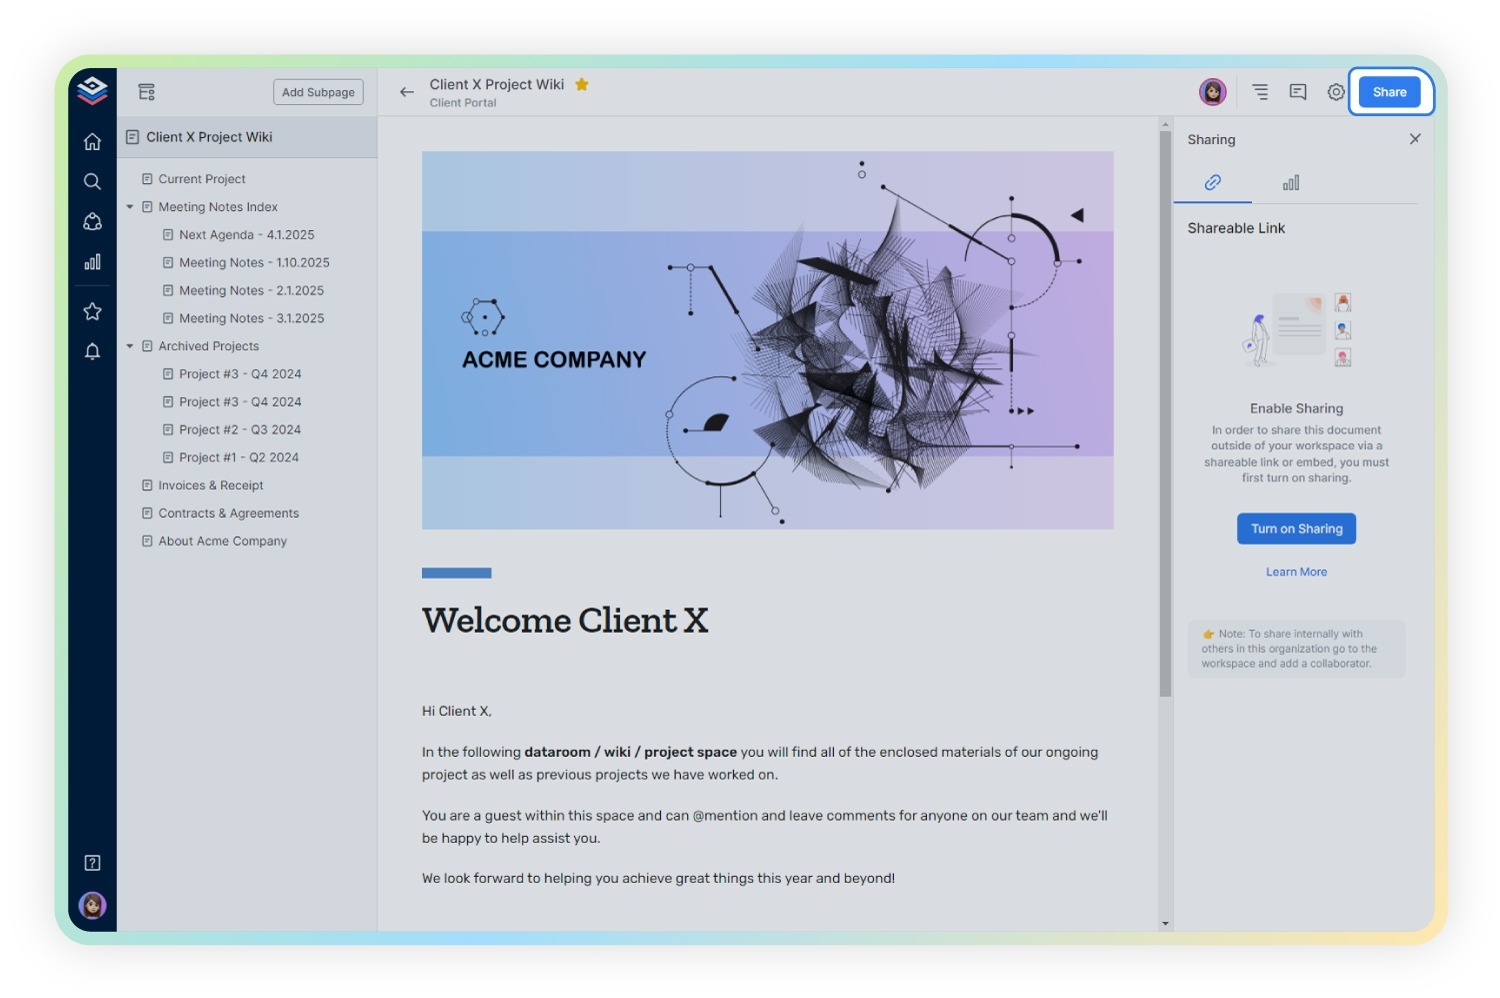
1. Live Document Sharing
Bit.ai makes it incredibly easy to share your educational documents with a wider audience. After creating a document, you can generate a unique, read-only link for it. This link can be shared with students, parents, or colleagues, allowing them to view the document without making any changes.
Benefits for Educators:
- Ease of Access: Students can access the shared document on any device, including computers, tablets, and smartphones, ensuring they can study or review materials anytime, anywhere.
- Consistent Layout: The document’s layout remains responsive and user-friendly, making it easy for viewers to navigate.
- Enhanced Learning Experience: Features like the table of contents and smart search functionality help students quickly find the information they need.
Tip: Always check the permissions before sharing to ensure the document is read-only unless you want the recipients to edit it.
Read more: How to Create Lesson plans in Simple Steps? (Free template)
2. Embedding Educational Content
Bit.ai allows you to embed your documents directly into any website or blog. By copying and pasting the provided embed code, you can integrate your educational content seamlessly into your online platforms.
Benefits for Educators:
- Centralized Resources: Embed documents in your classroom blog or school website to keep all learning materials in one place.
- Interactive Experience: Embedded documents retain interactive features, making it easier for students to engage with the content.
- Professional Presentation: Embedded documents look professional and maintain their format across different devices and screen sizes.
Tip: Use embedded documents to showcase sample essays, project guidelines, or interactive lessons on your class website.
3. Inviting Guests
For collaborative projects or external reviews, Bit.ai’s guest access feature is invaluable. Educators can invite guests into their workspace with read-only access, which is perfect for allowing external stakeholders to view specific documents or folders.
Benefits for Educators:
- Secure Collaboration: Share materials with guest lecturers, external evaluators, or parents without worrying about unauthorized edits.
- Controlled Access: Guests can view the content without making any changes, ensuring the integrity of your documents.
- Efficient Communication: Keep everyone in the loop by sharing progress updates or project outcomes with external parties.
Tip: When inviting guests, clearly define the purpose of their access and set expectations for their review or feedback.
4. Creating Trackable Links
Understanding how your students interact with the shared content can provide valuable insights. Bit.ai’s trackable links feature allows you to monitor document engagement, helping you tailor your teaching strategies.
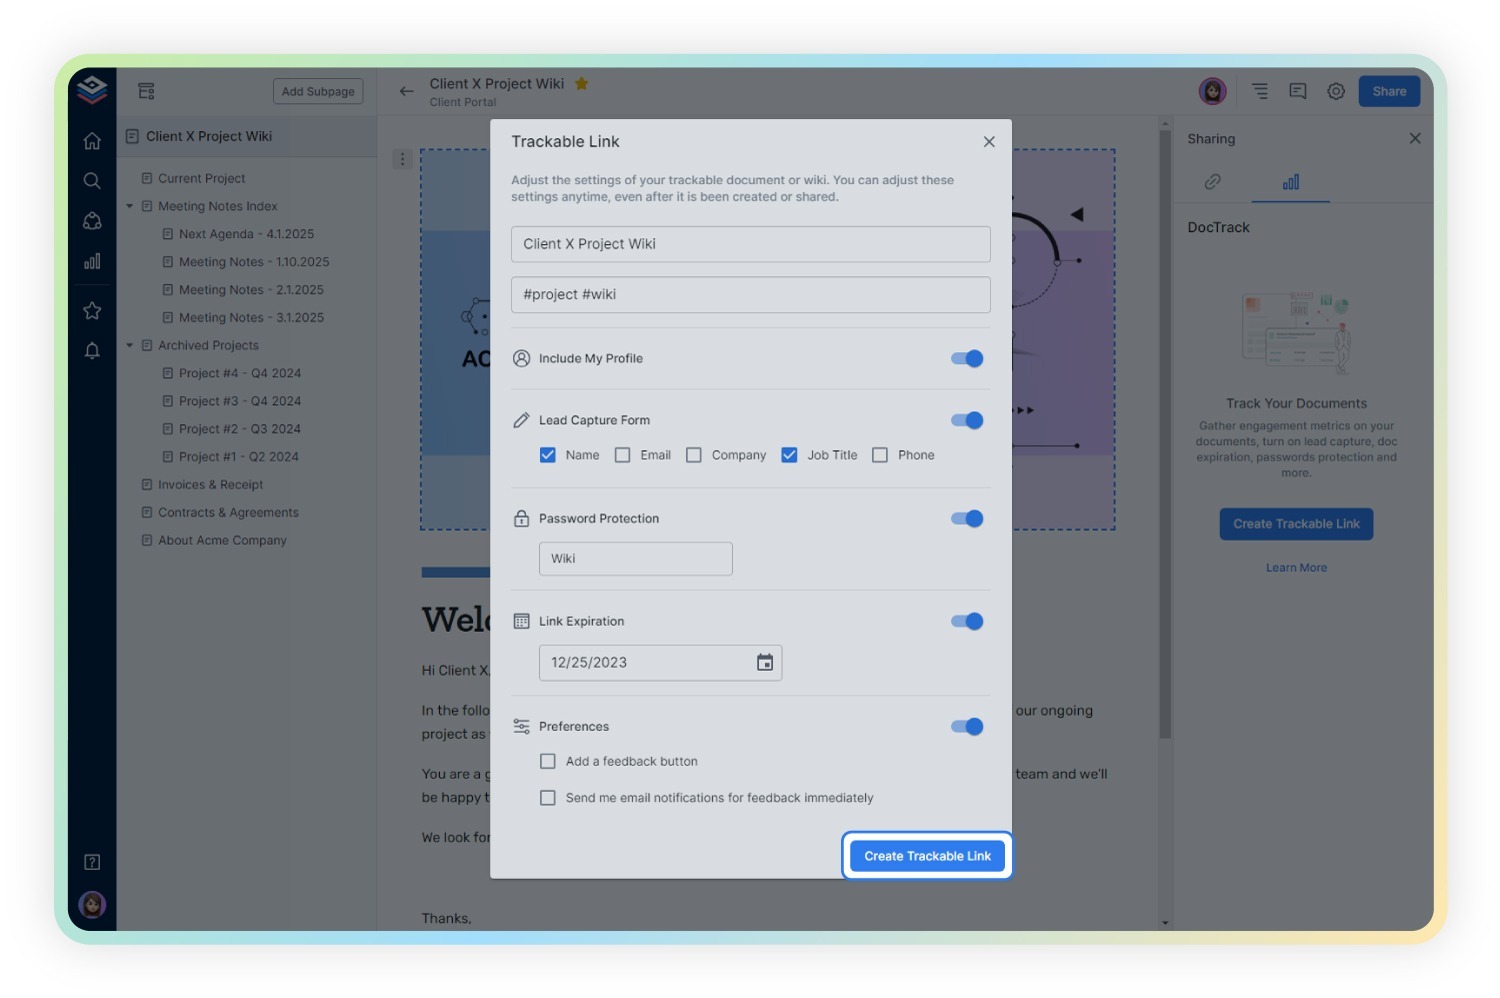
Benefits for Educators:
- Detailed Analytics: Track the number of views, time spent on the document, and feedback received to understand how students engage with the material.
- Optimize Content: Use the analytics to identify which sections of the document are most or least engaging and adjust your content accordingly.
- Secure Sharing: Add password protection, expiration dates, and lead capture forms to your links, ensuring that only the intended audience accesses your documents.
There you have it! In just a few steps, you’ve created a collaborative and informative wiki for your classroom or study group. Bit.ai makes the process so easy that you’ll be surprised at how quickly you can get your educational knowledge base up and running.
Bonus Resource: Wants to create an exam in minutes: try our AI exam generator
Final Thoughts
In this blog post, we have learned how educators can create and utilize wikis to enhance the learning experience.
Wikis offer a collaborative platform where students can share information, engage in discussions, and collectively build a repository of knowledge. Before you go, here are some practical tips to make the most of your educational wiki:
- Set Clear Guidelines: Establish rules and expectations for wiki contributions. This ensures that students know what is expected of them, promoting quality and consistency in the content.
- Encourage Collaboration: Foster a collaborative environment by encouraging students to work together on projects and assignments. This not only improves the quality of content but also builds teamwork skills.
- Incorporate Multimedia: Make your wiki more engaging by adding images, videos, and other multimedia elements. This can help to illustrate concepts more clearly and make the learning process more enjoyable.
- Monitor and Provide Feedback: Regularly check the content added to the wiki and provide constructive feedback. This helps students understand their mistakes and learn from them, improving the overall quality of the wiki.
- Keep it Organized: Structure your wiki with clear categories and pages. This makes it easier for students to find information and contributes to a more organized and effective learning tool.
Ready to transform your teaching with a wiki? Try Bit.ai today and see the difference it can make!
Further Reads:
- 12 Best Student Tools for Better Learning!
- Student Collaboration: What, Why and Tools!
- Collaborative Teaching: What is it & How to Do it the Right Way?
- How To Make Class Notes Worth Reading?