Imagine you’re a business owner wanting to create a comprehensive knowledge base for your customers, or perhaps you’re an educator looking to compile and share course materials with your students. Maybe you’re part of a community group that needs a central hub for all its documentation and guidelines.
In these scenarios, having a well-organized wiki on your website can be incredibly beneficial. It allows users to easily find the information they need, improves the overall user experience, and can even reduce your workload by addressing common questions and issues in one central location.
However, creating a wiki can often seem like a daunting task, especially if you don’t have any coding experience. Traditional methods of building a wiki involve complex coding and extensive technical knowledge, which can be overwhelming and time-consuming for many people. But don’t worry – there’s a much simpler solution available.
In this blog post, we will show you how you can add a fully functional wiki to your website without needing to write a single line of code. We’ll introduce you to a powerful tool that makes embedding a wiki straightforward and hassle-free, ensuring you can focus on creating great content instead of getting bogged down in technical details. Let’s dive in and see how you can easily enhance your website with a wiki.
What Can We Use a Wiki For?
Before diving into the technical aspects of adding a wiki to a website without coding, it’s important to understand the variety of content you can store in a wiki. Wikis are versatile tools that can serve as comprehensive repositories for various types of information. Here are some key examples of what you can include in a wiki:
- Technical Documentation: Wikis are ideal for storing how-to guides, tutorials, and user manuals. This makes it easy for team members and users to find detailed instructions and technical information quickly.
- Meeting Notes and Minutes: You can use a wiki to record meeting notes and minutes. This helps keep track of decisions, action items, and key discussions, ensuring that everyone is on the same page.
- Company Policies and Guidelines: Storing company policies, employee guidelines, and procedures in a wiki ensures that all staff have access to the most current and authoritative information.
- Project Plans and Timelines: Project management can be streamlined by using a wiki to store project plans, timelines, and milestones. This helps teams stay organized and ensures that everyone understands project goals and deadlines.
- Reports and Analysis: Wikis can be used to archive various reports and analyses, making it easier to reference and share important data and insights with team members.
- Customer Service Resources: A wiki can serve as a central hub for customer service resources such as FAQs, troubleshooting guides, and support documentation. This helps improve customer satisfaction by providing quick and easy access to helpful information.
- Team Contact Information and Organizational Charts: Maintaining up-to-date contact information and organizational charts in a wiki ensures that employees can easily find and connect with colleagues.
- News and Updates: A wiki is a great place to post company news, updates, and announcements. This keeps everyone informed about the latest developments and changes within the organization.
- Best Practices and Procedures: Documenting best practices and standard operating procedures in a wiki helps maintain consistency and quality across the organization.
- Employee Handbooks: Employee handbooks, which include information on company culture, benefits, and employment policies, can be easily accessed and updated through a wiki.
- Help Desk Resources: Wikis can store help desk resources, providing support teams with quick access to troubleshooting steps and solutions for common issues.
- Training Materials: Store training materials, including videos, slides, and quizzes, in a wiki to facilitate employee onboarding and continuous learning.
- Collaboration Notes: Wikis are great for collaboration, allowing teams to work together on documents, share ideas, and track changes in real-time.
By using a wiki to store these types of information, you can create a centralized, easily accessible knowledge base that benefits everyone in your organization. Now that you understand the potential of what can be stored in a wiki, let’s explore how you can add a wiki to your website without coding.
Steps to Add a Wiki on Your Website with Bit.ai
Creating a wiki on your website can greatly enhance the way your team shares information, collaborates and stays organized. If you’re looking for a no-code solution, Bit.ai is an excellent choice.
Bit.ai is a powerful AI-powered platform designed to help teams create, manage, and share knowledge effortlessly. In this guide, we’ll walk you through the steps to add a wiki to your website using Bit.ai, making the process simple and accessible even for those without any coding experience.
Step 1: Create a Workspace
Creating a wiki with Bit.ai begins by signing into your Bit.ai account. Once you’re logged in, you’ll be greeted with a dashboard where you can manage your workspaces and documents. To get started, click on the “Add Workspace” button, typically located prominently on the dashboard.
A workspace in Bit.ai is like a virtual hub where all your activities take place. It serves as a central location for storing and organizing your information, making it easy to collaborate with others. With Bit.ai, you have the flexibility to create as many workspaces as you need, as there’s no limit to the number of workspaces you can have.
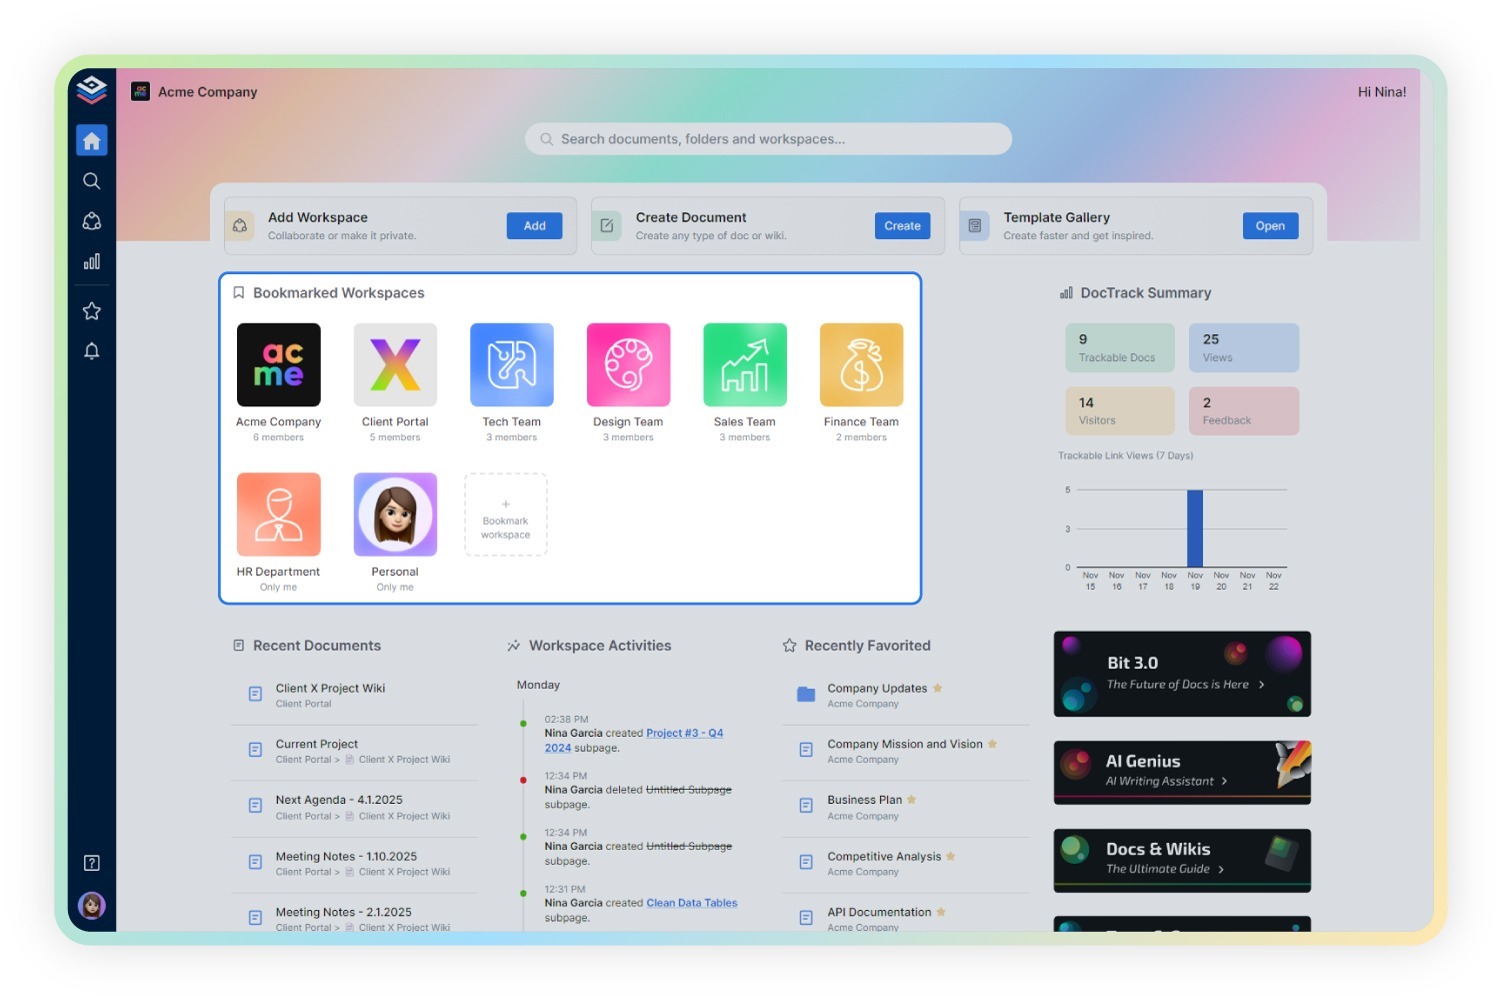
When creating a workspace, think about the type you want to create, whether it is private, cross-departmental, educational, project-based, team-based, etc.
Once you’ve chosen the type of workspace that best fits your needs, you can start organizing your work within the workspace. This includes creating projects, branches, versions, wikis, guides, documents, and notes, which can be neatly organized to facilitate growth over time.
Bit.ai also provides valuable insights into your workspace, giving you a comprehensive overview of workspace activities and documents. You can view metrics such as the number of documents, users, and guests in the workspace, as well as recent activity logs detailing changes and updates.
By pre-uploading digital assets to the asset library, teams can streamline their workflow and save time by eliminating the need to search for or recreate content from scratch. Instead of starting from scratch each time you create a document, you can access the asset library to find the content you need and insert it directly into your document.
Step 2: Onboard Team Members
Once you have set up your workspace, the next step is to add your team members, also known as collaborators. To do that, follow these steps:
- Go to the “Workspaces” section and select the workspace.
- Look for the option to add collaborators, usually a ‘(+)’ icon or in the “Settings” tab.
- Click it to open the collaborator pop-up.
- Click “Invite New User” and enter the email addresses of the new team members.
- Specify workspaces if needed.
- Click “Send Invitations” to dispatch the invites.
- Once accepted, new members will be added to the workspace automatically.
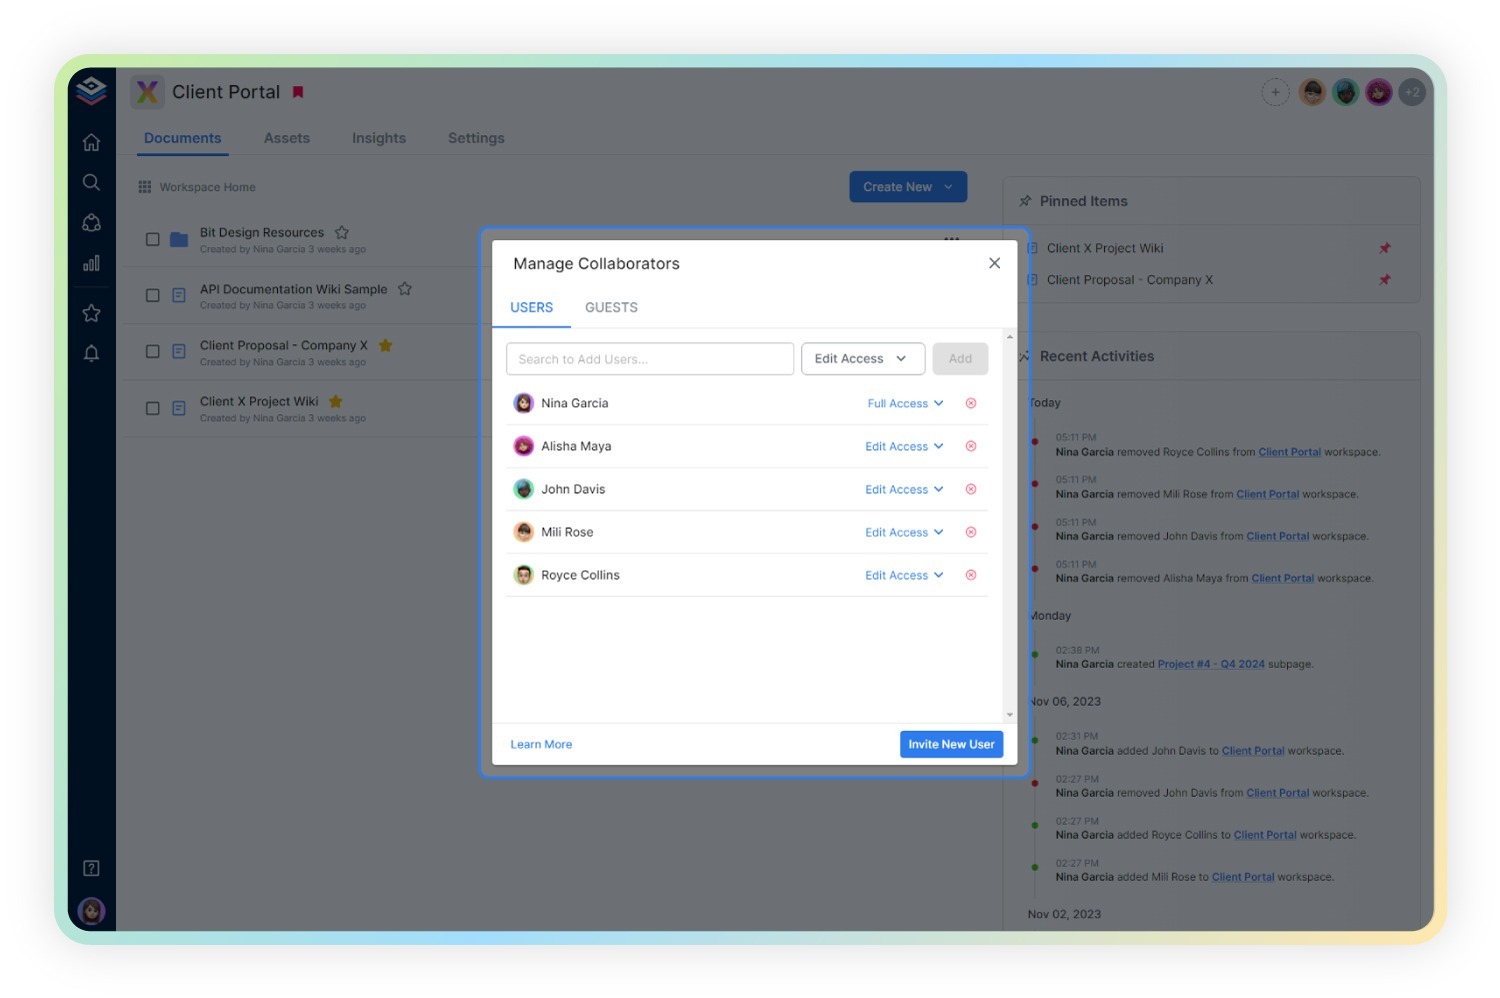
After entering the email address, you’ll also be given the option to assign a role to the new member. Bit.ai offers four different permission levels, each with its own set of capabilities:
- Full Access: Users with full access can edit, invite, share, and manage documents within the workspace. This level of access is typically reserved for team leaders or administrators who need complete control over the workspace.
- Edit Only: Users with edit-only access can edit and share documents within the workspace but do not have permission to invite new members or manage the workspace settings.
- Comment Only: Users with comment-only access can read documents and leave comments but cannot make any edits or changes to the content. This level of access is useful for stakeholders who need to provide feedback on documents without directly editing them.
- Read Only: Users with read-only access can view documents within the workspace but cannot make any edits, comments, or shares. This level of access is suitable for individuals who only need to access information without contributing to the content.
Choose the appropriate role for the new member based on their responsibilities and the level of access they need within the workspace.
Step 3: Start Creating Content
Once you have set up your wiki and added your team members, it’s time to make it come alive! Start adding content and explore some of the incredible features that Bit.ai offers to make your document creation process a breeze.
Smart Living Documents
Bit.ai smart documents are a type of interactive living documents designed to enhance your documentation needs. These documents go beyond traditional static files by integrating various digital content types within a single cohesive platform.
- Real-Time Collaboration: With Bit.ai, multiple collaborators can edit simultaneously, ensuring everyone’s on the same page. Plus, you’ll get instant notifications when someone mentions you or leaves a comment. Collaboration has never been smoother!
- Smart Editor: Formatting text is a breeze with Bit.ai’s Smart Editor. No more cluttered toolbars—simply highlight the text you want to format, and the options pop up right where you need them. You can select from multiple options such as bold, italics, strikethrough, headings (H1-H6), highlight, and much more.
- Smart Widgets: Bring your documents to life with Smart Widgets. From images and files to tables and code blocks, you can integrate rich digital content seamlessly. Not only that, your digital content comes alive in smart docs with its preview option. No need to open the file seperately.
- Table of Contents: Never lose track of your content with Bit.ai’s automated table of contents. It updates dynamically as you add or edit headers (H1-H3), making navigation a breeze. You can also use it to create hyperlinks within your document for easy reference.
- Inline Comments/ @Mention: Communicate seamlessly with your team using inline comments and @mentions. Highlight the text you want to discuss, add a comment, and notify your collaborators with just a few clicks. Collaboration has never been smoother!
- Version History: Did you accidently make a change you regret? Don’t worry; Bit.ai’s version history has got your back. You can revert to previous versions of your document and view who made changes and when. It provides a snapshot of previous versions. It’s like having a time machine for your documents!
AI Genius Writer
This nifty tool can help you out with all sorts of writing tasks, from brainstorming ideas to crafting detailed guides. Just type ‘@’ followed by your query, and watch as the AI comes to your rescue.
You can use it as an AI genius writer to create customizable templates for your documents, making it super easy to save time and energy. Whether you’re writing a how-to guide, a research paper, or a pros and cons list, AI genius has got you covered.
What’s even better is that the responses from AI Genius are automatically formatted by Bit.ai to match your document’s theme. No more worrying about weird formatting inconsistencies or spending hours tweaking the layout.
Step 4: Organize the Data
Now that you’ve got your content in place, it’s time to ensure it’s as tidy and accessible as possible. You’ve probably got loads of documents lying around, gathering digital dust. They might be Word files, PDFs, spreadsheets, you name it. And sure, they’re useful in their own right, but they’re also isolated islands of information, disconnected and hard to navigate.
This step is all about ensuring that finding the information you need is a breeze. Here’s how you can do it:
One of Bit.ai’s best features is its ability to seamlessly transform any document into a wiki. This means you can take your existing documents, whether they’re personal notes, team collaboration files, technical documentation, or anything else, and transform them into a structured, easy-to-navigate wiki format.
With Bit.ai’s smart wiki, you can organize your information efficiently. You’re not just stuck with a linear document anymore. You can create subpages within subpages, forming an unlimited hierarchy. This allows you to dive deep into specific topics while keeping everything neatly organized.
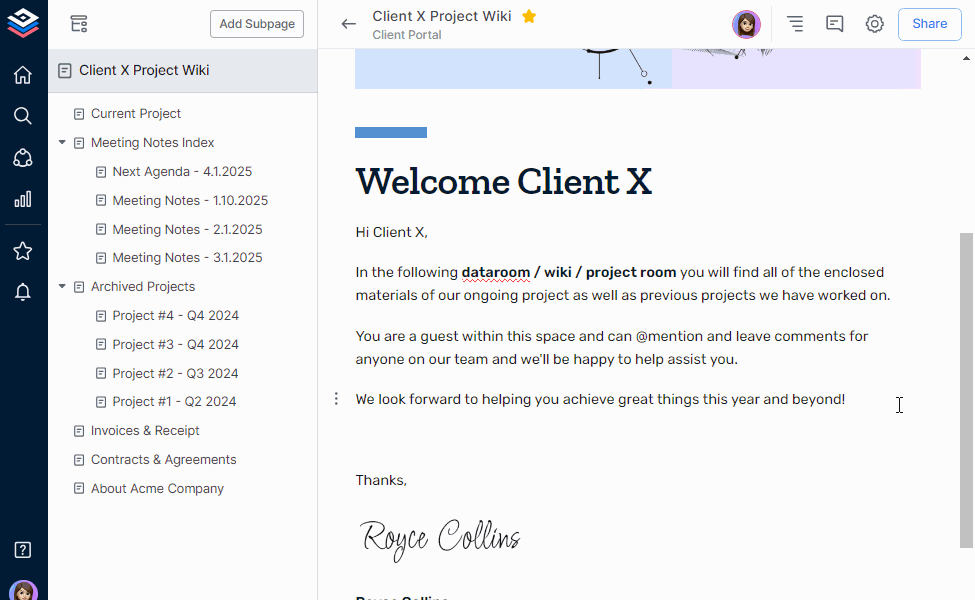
The navigation panel lets you move around effortlessly, whether you’re exploring different sections or jumping between subpages. Plus, rearranging subpages is simple. Just hover over a subpage, click, and drag it to where you want it to be. Whether you’re reordering pages or nesting subpages within each other, you have complete control.
And let’s talk about search. Bit.ai’s smart search feature is a game-changer. Located conveniently on the left bar of the platform, it’s always within reach. You can search various elements, from workspaces and folders to document titles and content within documents. This means finding exactly what you need is quick and easy, saving you valuable time.
But what sets Bit.ai apart is how it takes you directly to the exact location within a document or subpage when you click on a search result. No more sifting through endless pages or scrolling aimlessly. With Bit.ai, you’re guided straight to the information you seek, making your workflow smoother and more efficient.
Step 5: Embed Wiki on Your Website
Now that you’ve created your Bit doc or wiki and have it all set up, it’s time to share it with the world by embedding wiki directly onto your website. Here’s how you can do it in a few simple steps:
- Open Your Bit Document: First things first, navigate to the Bit doc or wiki (the parent page) that you want to share. Once you’re there, look for the ‘Share’ button situated on the far right side of the top bar.
- Enable Sharing: After clicking on the ‘Share’ button, you’ll likely encounter a prompt asking you to enable sharing. Don’t hesitate, just click on ‘Turn on Sharing’ to allow others to access your document.
- Access the Embed Code: Now, head over to the Embed Code section. You’ll find it conveniently located within the sharing settings. Open up the menu and voila! There’s your embed code waiting for you.
- Copy and Paste: Copy the embed code provided. You can then paste this code onto any website or blog where you want your Bit doc or wiki to appear. Plus, you have the flexibility to customize various aspects like width, height, frame border, and more to suit your preferences.
And that’s it! Your Bit doc or wiki is now seamlessly integrated into your website, enriching your online presence with valuable content. It’s a fantastic way to share knowledge, collaborate with others, and engage your audience directly from your own digital space.
6. Re-check Before Publishing
Before publishing your wiki, take a moment to preview it. This allows you to see how your content will appear to your audience. Check for any formatting issues, layout inconsistencies, or missing elements. Make sure everything is clear and easy to read.
Double-check all links and embedded media within your wiki. Ensure that they are functioning correctly and lead to the intended destination. This helps provide a seamless browsing experience for your users.
Take one last look at your content to ensure accuracy and relevance. Verify that all information is up-to-date and aligned with your website’s objectives. Make any necessary edits or revisions before proceeding.
If your wiki includes interactive elements such as forms or quizzes, test them to ensure they are working as intended. This allows you to identify and fix any potential issues before your audience encounters them.
Once you’re satisfied with the preview and have addressed any issues, it’s time to publish your wiki. Hit the publish button to make your content live and accessible to your audience. Congratulations, you’ve successfully added a wiki to your website using Bit.ai!
Final Thoughts
In conclusion, adding a wiki to your website without coding has never been easier. Throughout this guide, we’ve explored the simplicity of integrating a wiki into your online platform without needing technical expertise or coding skills.
Thanks to user-friendly platforms like Bit.ai, the process becomes even more seamless. With Bit.ai, you can effortlessly create, manage, and collaborate on wikis with just a few clicks. No need to worry about complex coding or technical jargon – Bit.ai is designed to simplify your life.
Take the next step toward enhancing your website with a wiki by visiting bit.ai today. With little to no technical knowledge required, you’ll be amazed at how effortless it can be to create a dynamic and informative online resource for your audience.
Further Reads:
Company Wiki Vs Knowledge Base: What Makes Them Different?
How To Create a Smart Company Wiki | A Guide by Bit.ai
25 Best AI Tools For Peak Productivity!
Marketing Budget: What it is & How to Put it Together?